Import Data from SaaS Services
Create Context Graph can pull data from SaaS services and map it into your Neo4j knowledge graph. This guide covers how to configure connectors during project scaffolding and how to re-import data afterward.
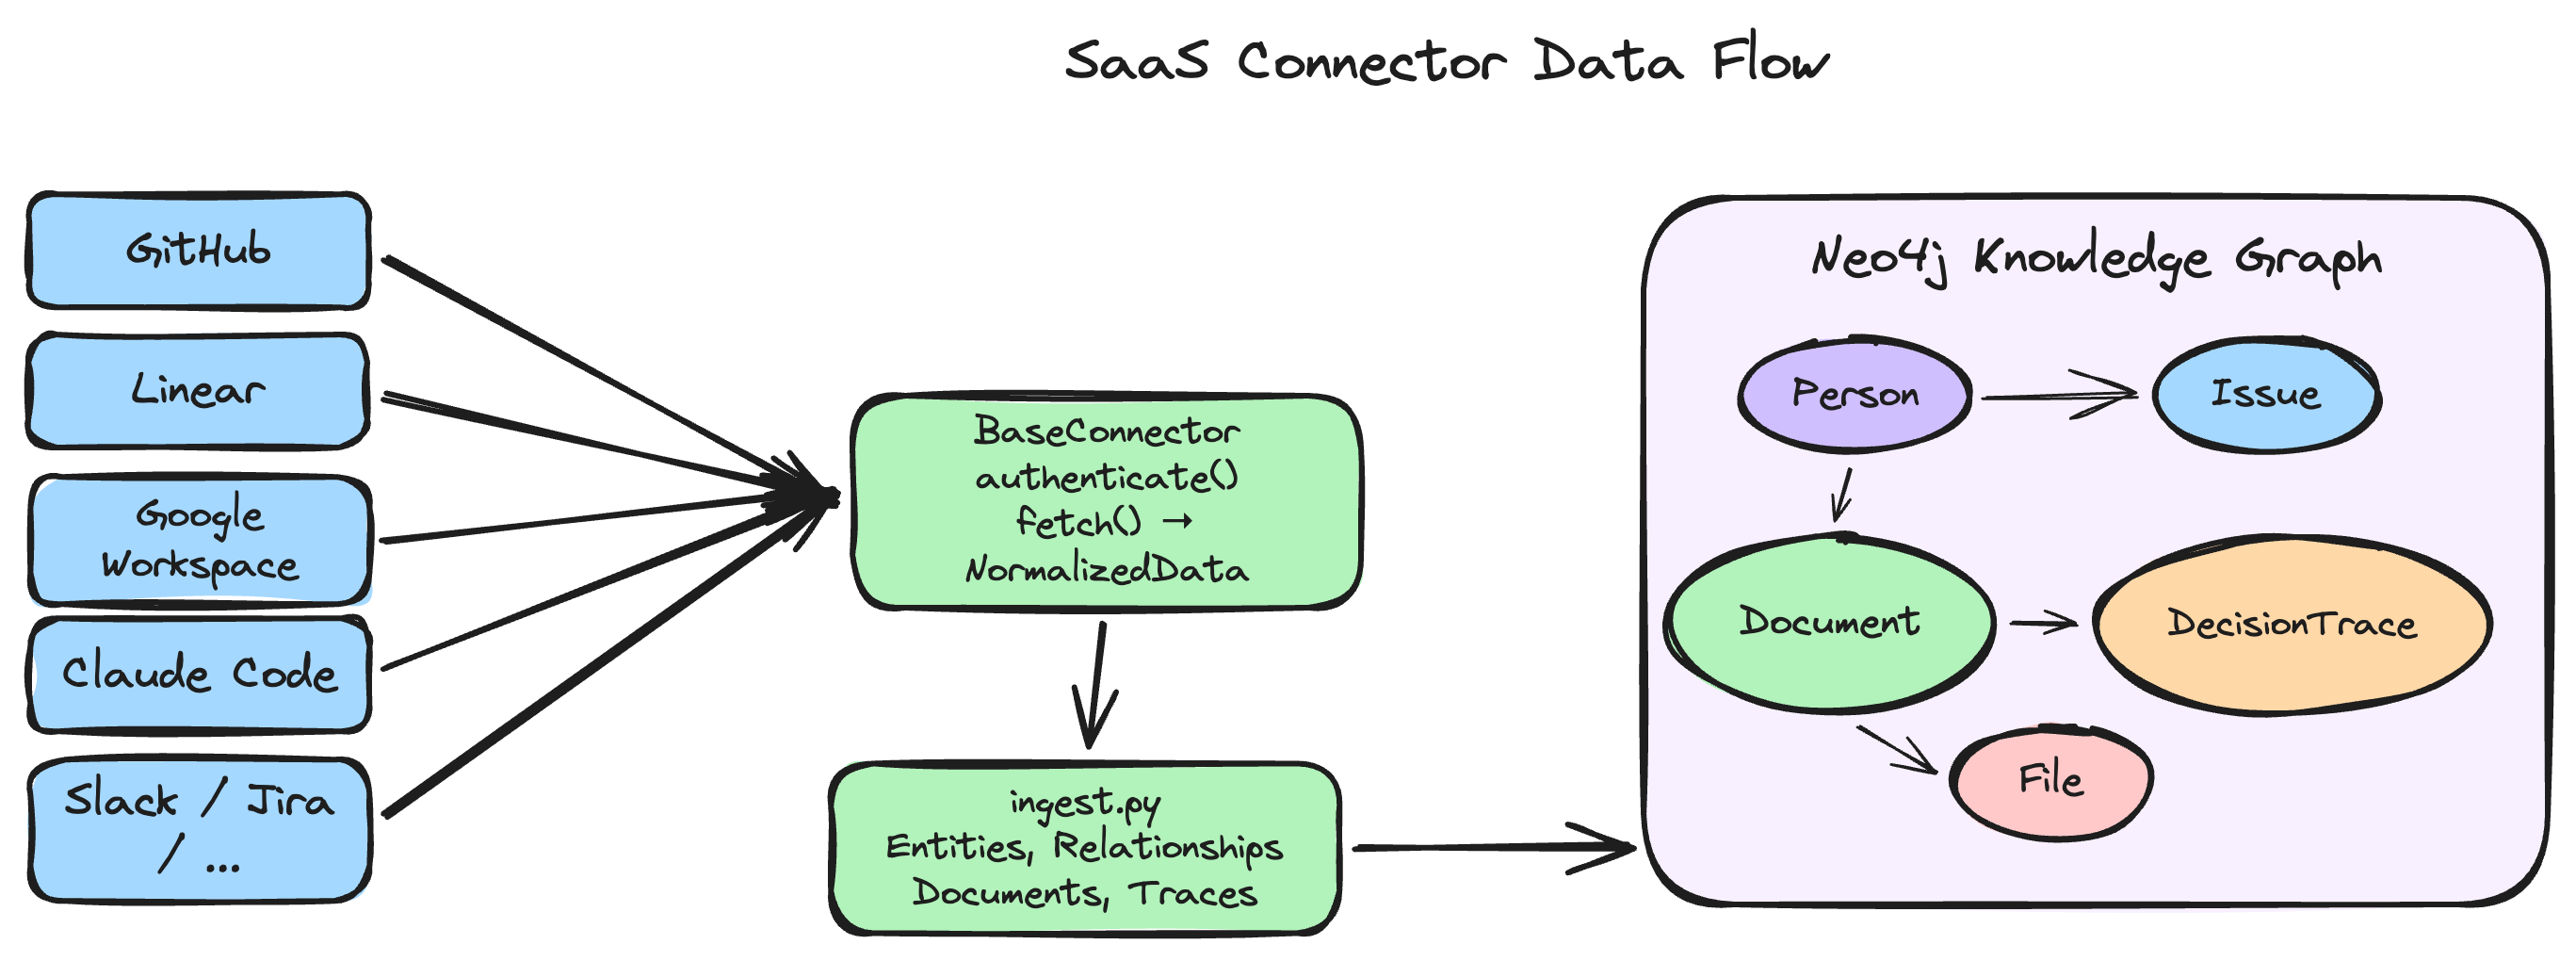
Available Connectors
| Service | What It Imports | Auth Method |
|---|---|---|
| GitHub | Repositories, issues, pull requests, commits, users, code reviews | Personal access token (PAT) |
| Notion | Pages, databases, blocks, users, comments | Internal integration token |
| Jira | Projects, issues, sprints, users, comments, worklogs | API token + Atlassian email |
| Slack | Channels, messages, threads, users, reactions | Bot token (OAuth) |
| Gmail | Emails, threads, contacts, labels, attachments (metadata) | Google OAuth 2.0 / service account |
| Google Calendar | Events, attendees, calendars, recurring series | Google OAuth 2.0 / service account |
| Salesforce | Accounts, contacts, opportunities, leads, cases, activities | OAuth 2.0 connected app |
| Linear | Issues, projects, cycles, teams, users, labels, comments, milestones, initiatives, attachments + decision traces | Personal API key |
| Google Workspace | Drive files, comment threads (as decision traces), revisions, Drive Activity, Calendar events, Gmail metadata | Google OAuth 2.0 |
| Claude Code | Session history, messages, tool calls, files, decisions, preferences, errors | None (local files) |
| Claude AI | Conversations, messages, tool calls, thinking traces from Claude AI web/app export | None (local file) |
| ChatGPT | Conversations, messages, tool results from ChatGPT data export | None (local file) |
Selecting Connectors in the Interactive Wizard
When you run create-context-graph my-app, the wizard includes a step to connect SaaS services:
- Select "Connect to SaaS services" when prompted for your data source.
- Pick one or more connectors from the checklist.
- Enter the required credentials for each selected connector (tokens, keys, etc.).
- The scaffolded project will include connector configuration in
.envand an import pipeline inbackend/scripts/.
Non-Interactive CLI Usage
Pass --connector flags to skip the wizard:
create-context-graph my-app \
  --domain software-development \
  --framework pydanticai \
  --connector github \
  --connector slack
You can combine --connector with any domain and framework flags. Each connector will prompt for its credentials unless they are already set as environment variables.
Linear example
Import your Linear workspace data into a context graph:
create-context-graph my-project \
  --domain software-engineering \
  --framework pydanticai \
  --connector linear \
  --linear-api-key lin_api_xxxxx \
  --linear-team ENG
The --linear-team flag is optional. If omitted, all teams in the workspace are imported.
Google Workspace example
Import Drive files, comment threads, and revision history from a specific folder:
create-context-graph my-decisions-app \
  --domain software-engineering \
  --framework pydanticai \
  --connector google-workspace \
  --gws-folder-id 1aBcDeFgHiJkLmNoPqRsT
Add Calendar events and Gmail metadata for full decision context:
create-context-graph my-decisions-app \
  --domain software-engineering \
  --framework pydanticai \
  --connector google-workspace \
  --gws-folder-id 1aBcDeFg \
  --gws-include-calendar \
  --gws-include-gmail \
  --gws-since 2026-01-01
Claude Code example
Import your Claude Code session history from the current project:
create-context-graph my-dev-graph \
  --domain software-engineering \
  --framework claude-agent-sdk \
  --connector claude-code
Import all projects with a time filter:
create-context-graph my-dev-graph \
  --domain software-engineering \
  --framework claude-agent-sdk \
  --connector claude-code \
  --claude-code-scope all \
  --claude-code-since 2026-03-01
No API key or credentials are needed -- the connector reads local JSONL files from ~/.claude/projects/.
Claude AI chat history example
Import your Claude AI conversation export into a context graph:
create-context-graph my-chat-graph \
  --domain personal-knowledge \
  --framework pydanticai \
  --import-type claude-ai \
  --import-file ~/Downloads/claude-export.zip
Filter by date or title:
create-context-graph my-chat-graph \
  --domain personal-knowledge \
  --framework pydanticai \
  --import-type claude-ai \
  --import-file ~/Downloads/claude-export.zip \
  --import-filter-after 2025-10-01 \
  --import-filter-title "python|neo4j"
No API key or credentials are needed -- the connector reads the local export file you downloaded from Claude AI settings.
ChatGPT chat history example
Import your ChatGPT conversation export:
create-context-graph my-chat-graph \
  --domain personal-knowledge \
  --framework pydanticai \
  --import-type chatgpt \
  --import-file ~/Downloads/chatgpt-export.zip
The ChatGPT parser handles the tree-structured message format automatically, following the main conversation path at branch points.
See the Import Your AI Chat History tutorial for a complete walkthrough including how to export from each platform.
Combining connectors
Use both Google Workspace and Linear for the full decision lifecycle -- from meeting discussion to code execution:
create-context-graph my-full-context-app \
  --domain software-engineering \
  --framework pydanticai \
  --connector google-workspace \
  --connector linear \
  --gws-folder-id 1aBcDeFg \
  --gws-include-calendar \
  --linear-api-key lin_api_xxxxx
The connectors automatically cross-link: Linear issue references found in Google Docs comments or document names create RELATES_TO_ISSUE relationships.
Gmail and Google Calendar Setup
Gmail and Google Calendar connectors use the Google Workspace CLI (gws) for OAuth flows. When you select either connector, the wizard checks whether gws is installed:
- If found, it uses
gwsto handle the OAuth consent flow and token refresh. - If not found, the wizard offers to install it automatically (
pip install gws). - You can skip the install and provide a service account JSON key file instead.
Both connectors share the same Google Cloud project credentials, so configuring one makes the other available with no extra setup.
Re-Importing Data in a Generated Project
After scaffolding, the generated project includes Makefile targets for data import:
# Import data from all configured connectors
make import

# Import data and seed the graph with demo scenarios
make import-and-seed
These targets read credentials from the .env file in the project root.
Connector Credential Setup
GitHub — Personal access token
- Go to Settings > Developer settings > Personal access tokens > Tokens (classic).
- Generate a token with
repo,read:org, andread:userscopes. - Set
GITHUB_TOKENin.env.
Notion — Internal integration token
- Go to notion.so/my-integrations and create an internal integration.
- Copy the Internal Integration Secret.
- Share the target pages/databases with your integration.
- Set
NOTION_TOKENin.env.
Jira — API token + Atlassian email
- Go to id.atlassian.com/manage-profile/security/api-tokens and create an API token.
- Set
JIRA_EMAIL,JIRA_API_TOKEN, andJIRA_BASE_URL(e.g.,https://yourorg.atlassian.net) in.env.
Slack — Bot OAuth token
- Create a Slack app at api.slack.com/apps.
- Add bot token scopes:
channels:history,channels:read,users:read,reactions:read. - Install the app to your workspace and copy the Bot User OAuth Token.
- Set
SLACK_BOT_TOKENin.env.
Gmail / Google Calendar — Google OAuth 2.0
- Create a project in Google Cloud Console.
- Enable the Gmail API and/or Google Calendar API.
- Create OAuth 2.0 credentials (Desktop app type) and download the JSON file.
- Set
GOOGLE_CREDENTIALS_FILEin.envpointing to the downloaded JSON.
Salesforce — OAuth 2.0 connected app
- In Salesforce Setup, go to App Manager and create a new Connected App.
- Enable OAuth and select scopes:
api,refresh_token,offline_access. - Set
SALESFORCE_CLIENT_ID,SALESFORCE_CLIENT_SECRET,SALESFORCE_USERNAME,SALESFORCE_PASSWORD, andSALESFORCE_SECURITY_TOKENin.env.
Google Workspace — Google OAuth 2.0 (Drive, Activity, Calendar, Gmail)
- Go to Google Cloud Console and create a project (or select an existing one).
- Navigate to APIs & Services > Library and enable: Google Drive API, Drive Activity API, and optionally Google Calendar API and Gmail API.
- Navigate to APIs & Services > Credentials and create an OAuth client ID (Desktop app type).
- Set
GOOGLE_CLIENT_IDandGOOGLE_CLIENT_SECRETin.env. - Optionally set
GWS_FOLDER_IDto a Drive folder ID to scope the import.
The connector imports files, comment threads (with resolution detection), revision history, Drive Activity, and optionally Calendar events and Gmail thread metadata. Resolved comment threads are extracted as decision traces. It also provides 10 decision-focused agent tools.
See the Decision Traces from Google Workspace tutorial for a complete walkthrough.
Linear — Personal API key
- Open Linear Settings > Security & Access > API (or navigate to
linear.app/settings/api). - Click Create key to generate a personal API key.
- Set
LINEAR_API_KEYin.env. - Optionally set
LINEAR_TEAMto a team URL key (e.g.,ENG) to limit the import to a single team.
The connector imports 12 entity types (issues, projects, cycles, teams, users, labels, workflow states, comments, project updates, milestones, initiatives, attachments), issue relations, threaded comments with resolution tracking, and decision traces from issue history. Validates team keys during authentication, retries on rate limits with exponential backoff. Uses only Python's built-in urllib.
See the Build a Linear Context Graph tutorial for a complete walkthrough.
Claude Code — No setup required (local files)
No setup required. The connector reads session JSONL files directly from ~/.claude/projects/ on your local machine.
It parses session files, extracts decisions (user corrections, deliberation, error-resolution cycles, dependency changes), extracts preferences (explicit statements, behavioral patterns), redacts secrets, tracks files, and provides 8 session intelligence agent tools.
See the Build a Developer Knowledge Graph from Claude Code Sessions tutorial for a complete walkthrough.
Claude AI — No setup required (export file)
Export your data from Claude AI:
- Open claude.ai and go to Settings > Account > Export Data.
- Confirm the export. You'll receive an email with a download link.
- Download the
.zipfile and pass it to the CLI with--import-type claude-ai --import-file <path>.
See the Import Your AI Chat History tutorial for a complete walkthrough.
ChatGPT — No setup required (export file)
Export your data from ChatGPT:
- Open chatgpt.com and go to Settings > Data Controls > Export data.
- Confirm the export. You'll receive an email with a download link.
- Download the
.zipfile and pass it to the CLI with--import-type chatgpt --import-file <path>.
See the Import Your AI Chat History tutorial for a complete walkthrough.
Further Reading
- CLI Options -- all connector-related flags
- Google Workspace Schema -- complete entity and relationship reference
- Claude Code Schema -- complete entity and relationship reference
- Chat Import Schema -- Claude AI and ChatGPT graph schema