Your First Context Graph App
This includes project creation, Neo4j setup, data seeding, and exploration.
This tutorial walks you through creating a context graph application from scratch, starting it up, and exploring its features. By the end, you will have a running app with a Neo4j knowledge graph, a FastAPI backend with an AI agent, and a Next.js frontend with graph visualization.
Prerequisites
Before you begin, make sure you have:
- Python 3.11+ -- check with
python --version - Node.js 18+ -- check with
node --version - Docker (optional) -- one option for running Neo4j locally. Alternatives: Neo4j Aura (free cloud) or
@johnymontana/neo4j-local(requires Node.js) - uv (recommended) -- install with
curl -LsSf https://astral.sh/uv/install.sh | sh
Step 1: Create the Project
Run the CLI to launch the interactive wizard:
uvx create-context-graph
The wizard walks you through seven steps:
- Project name -- enter a name like
my-health-app - Data source -- generate demo data or connect SaaS integrations
- Domain -- select from 22 built-in domains (e.g., Healthcare)
- Agent framework -- choose your preferred framework (e.g., PydanticAI)
- Neo4j connection -- for this tutorial, choose Docker (easiest if you have Docker installed) or Neo4j Aura (free cloud, no install). See the Neo4j setup guides for all options.
- API keys -- provide keys for your chosen agent framework
- Confirmation -- review and confirm
The tool generates a complete project in your chosen directory.
Non-Interactive Alternative
If you prefer to skip the wizard, pass all options as flags:
uvx create-context-graph my-health-app \
  --domain healthcare \
  --framework pydanticai \
  --demo-data
Step 2: Start the App
Navigate to your new project and use the provided Makefile to get everything running:
cd my-health-app
Install dependencies for both the backend and frontend:
make install
Start Neo4j (depends on the option you selected):
# If using Docker:
make docker-up

# If using neo4j-local (no Docker required):
make neo4j-start

# If using Neo4j Aura or an existing instance: skip this step
For Docker, this launches a Neo4j container with the default credentials (neo4j/password). Wait a few seconds for it to become available.
Seed the database with your domain schema and demo data:
make seed
This creates the graph schema (constraints and indexes) and loads the fixture data into Neo4j.
Start the application (backend and frontend):
make start
Step 3: Explore the App
With everything running, you have three interfaces to explore:
Frontend -- http://localhost:3000
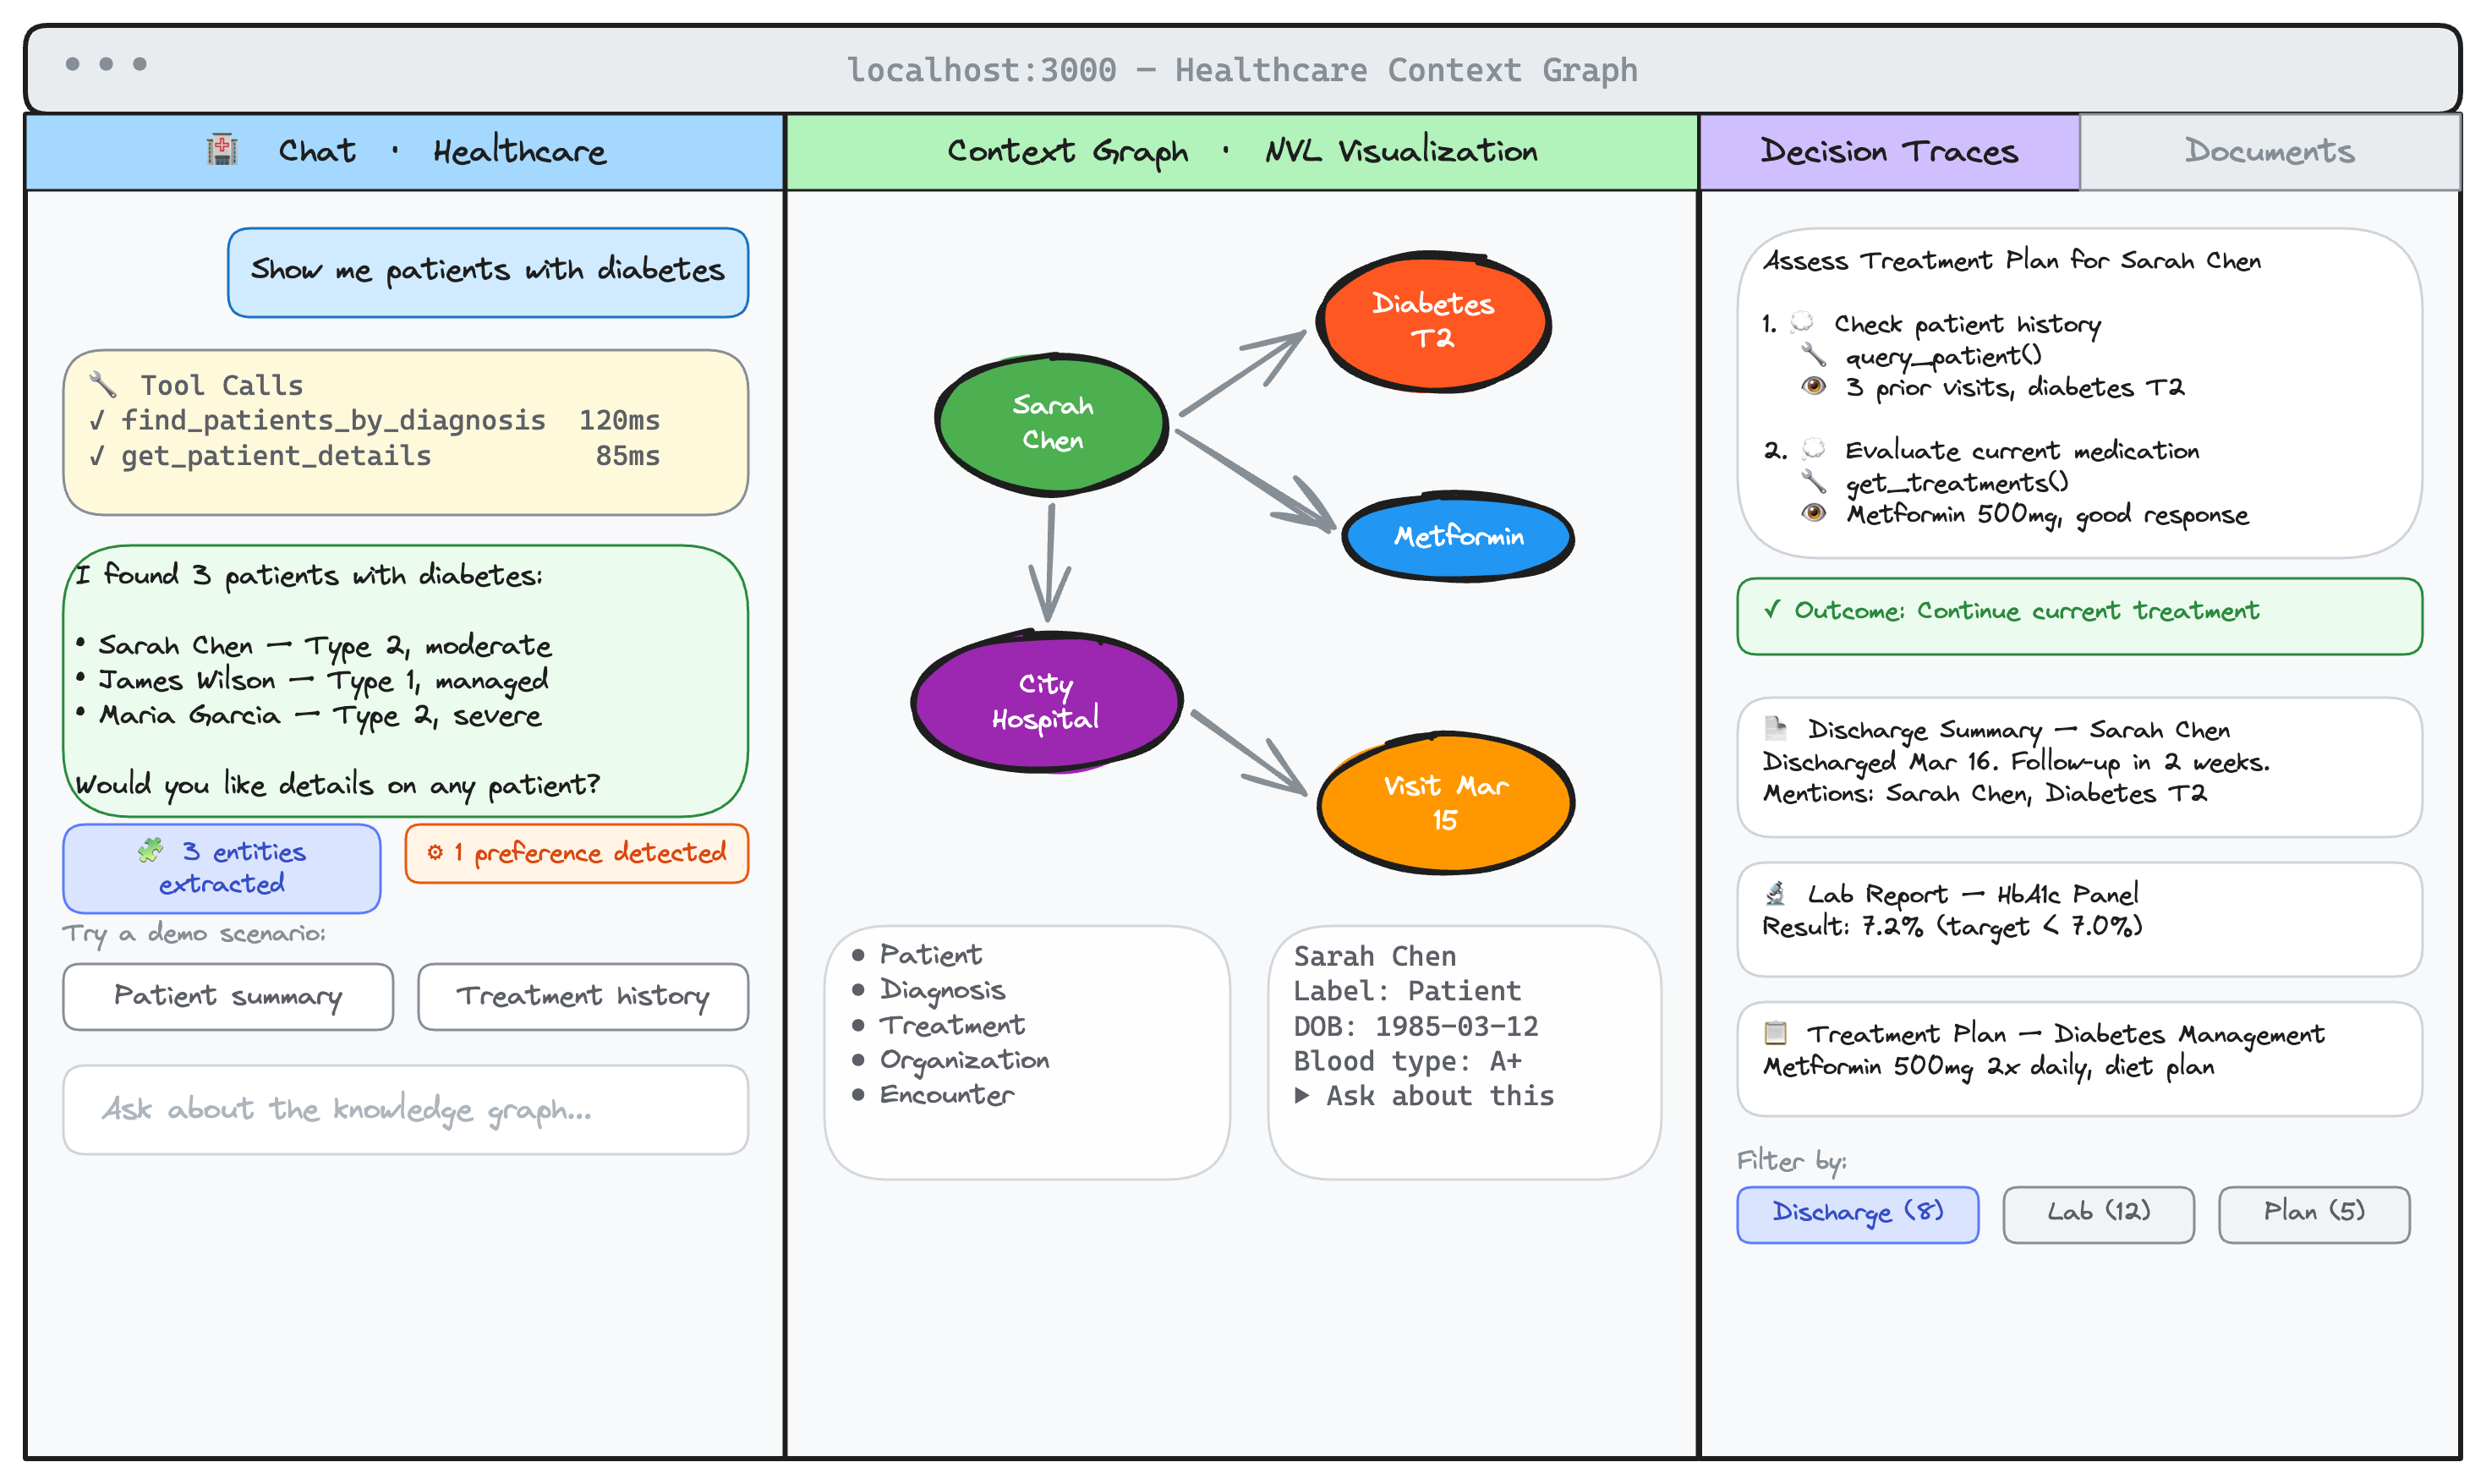
The Next.js frontend provides a three-panel layout:
- Chat interface (left) -- talk to your AI agent using natural language. Responses stream in real-time: tool calls appear as a live timeline with spinner indicators as each executes, and text tokens appear incrementally. Conversations are multi-turn (the agent remembers what was discussed in the current session). Responses are rendered as markdown with formatted code, lists, and tables. Expand any tool call to see inputs and output details. Clickable demo scenario buttons get you started.
- Context graph view (center) -- an interactive NVL graph visualization showing entities and relationships. Nodes are color-coded by type. Click any node to open an entity detail panel showing all properties, labels, and connections.
- Right panel with tabs:
- Decision Traces -- pre-seeded reasoning traces showing the agent's step-by-step thinking (thought, action, observation) with full outcomes.
- Documents -- browse domain-specific documents (discharge summaries, trade confirmations, lab reports, etc.) with template type filtering. Click any document to read the full content with mentioned entity badges.
Backend API -- http://localhost:8000/docs
The FastAPI backend exposes a Swagger UI with all available endpoints. Key routes include:
POST /chat-- send a message to the agent (non-streaming)POST /chat/stream-- streaming chat via Server-Sent EventsGET /documents-- list documents with optional template filterGET /documents/{title}-- full document content with mentioned entitiesGET /traces-- decision traces with full reasoning stepsGET /entities/{name}-- full entity detail with properties and connectionsPOST /cypher-- execute arbitrary Cypher queries
Neo4j Browser -- http://localhost:7474
Connect to the Neo4j Browser to explore your graph directly. Use the default credentials (neo4j/password) and run Cypher queries. A good starting point:
MATCH (n)-[r]->(m) RETURN n, r, m LIMIT 100
Step 4: Try Demo Scenarios
Each domain comes with pre-built demo scenarios to showcase the agent's capabilities. For the healthcare domain, try these prompts in the chat interface:
Patient lookup:
- "Show me all patients currently diagnosed with Type 2 Diabetes"
- "What medications is patient Johnson currently taking?"
Clinical decision support:
- "Are there any contraindicated medications in patient Chen's current prescriptions?"
- "What treatments have been most effective for similar patients with heart failure?"
Provider network:
- "Which cardiologists are affiliated with Memorial Hospital?"
- "Show the referral network for Dr. Johnson"
Watch the decision trace panel as the agent processes each query -- you will see it select tools, execute Cypher queries against Neo4j, and synthesize the results into a response.
What's Next
- Customizing Your Domain Ontology -- modify entity types, relationships, and agent tools to fit your use case
- Import Data from SaaS Services -- connect real data from GitHub, Linear, Slack, and more
- Switch Agent Frameworks -- try PydanticAI, Claude Agent SDK, LangGraph, or other frameworks
- Connect Claude Desktop -- query the same knowledge graph from Claude Desktop via MCP
Ready for more? Continue with Customizing Your Domain Ontology to learn how to modify entity types, relationships, and agent tools.